A guide to creating the best looking line art in print in the new digital print world
Part 10
Still Cleaning Line Art Originals!
This is the ninth installment of Paper to Pixel to Paper Again, a series that explains (in an overly thorough manner) the how-to's of preparing line art (and later in the series, color art!) for print.
If you haven't done so yet, please go back and read the previous installments.
And as always, if you have any questions, please let me know in the comments!
***
At the end of our last installment, we were still in the midst of learning to clean our line art originals. And I had done all of the work so far with none of what you might think of as the "traditional" Photoshop cleanup tools. We'll get to why in a bit.
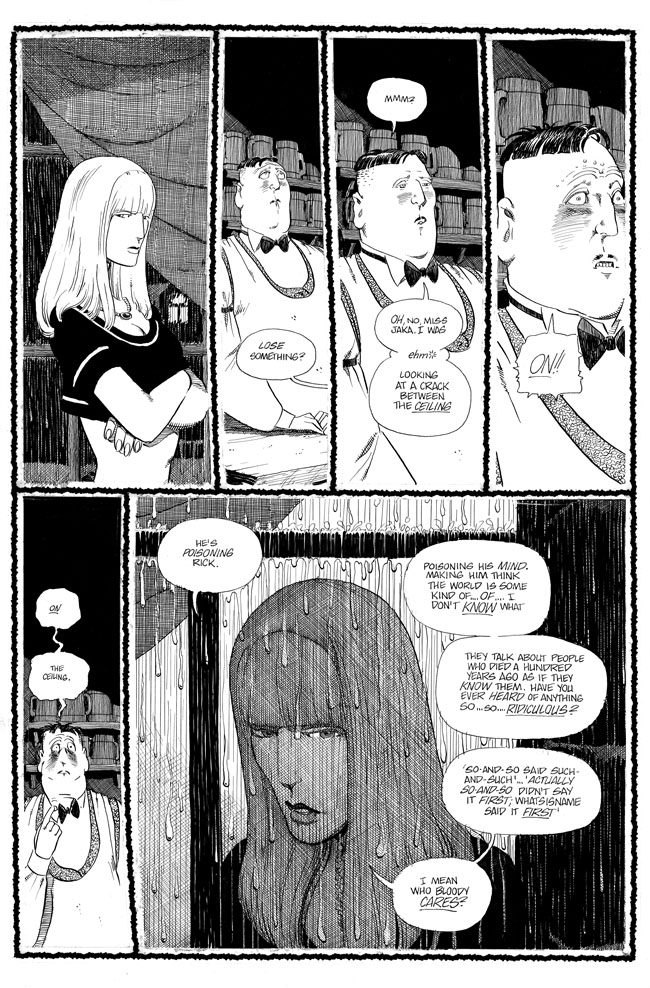
Let's take a look at another page from Jaka's Story, the book I'm currently in the cleanup stage of.
![]() This far zoomed out, the page is looking pretty good, with only a few visible problem areas. But really good commercial printing has a much higher effective resolution than even the best monitors around, so zooming in "waaaay too close" is important.
This far zoomed out, the page is looking pretty good, with only a few visible problem areas. But really good commercial printing has a much higher effective resolution than even the best monitors around, so zooming in "waaaay too close" is important.
First I take care of making the white outer mask for the page with the marquee selection tool and the Paint Bucket, as discussed last week, and then use the Median noise filter on the edge of the panel border, also as discussed. Now I'm going to take a look at that first panel a little tighter in.
![]()
![]()
You can see we've got the "panel border shmutz" problem happening here pretty severely. Some of this might be caused by the sticky edge of the carrier film for the border "catching" schmutz over time. But some of it also looks like stray ink lines that were incompletely scraped off the border tape. You can also see an area (to the left and right of the Jaka figure here) that weren't scraped off at all). Regardless of the why, if we let this go as-is, it's going to mar the beautiful clean white border that's the intended look here. So clearly we're ready for another technique!
Oh! Hey! How about —
Cleanup Method D: Dodge Tool
Go ahead and select your Sharpen layer, i.e. the layer that represents your actual sharpened, visible artwork. And then select the Dodge tool (or hit O. Learn your shortcuts!)
In the upper tool preferences bar, change the "Range" to Highlights and the "Exposure" to 100 percent. This is now our "schmutz on white" tool, the perfect way to brush an area to eliminate black on white schmutz on a page.
Very important: DO NOT use this tool over an area of dot tone or mechanical hatching! Even if the effect is not visible to you on screen, it WILL be visible in print. Your eye "reads" dot tone as a continuous gray tone, and thus any changes made to it, however slight, are visible in print when it's resolving to your eye.
With the above caveat in mind, why use this tool? Well, because it's only effecting the highlights of an area, you can sweep over the edge of, say, that cross-hatching, and not have to be as precise as you would be with a brush.
![]()
![]()
So with a little bit of work with the Dodge tool, I've eliminated a lot of the border schmutz, but there's still some work to do. I think it's time, finally to switch to the tool I've been avoiding.
Cleanup Method E: the Brush tool
Yes, the humble Brush tool (hit B for the shortcut). It's the most basic cleanup method available to you. For our purposes, we want pretty specific settings:
Round brush--no fancy pants shapes or blending modes etc.
100 Percent opacity
Hardness at 100 percent
Size controlled by pressure of pen on tablet (buy a tablet!)
Color at either 100 percent black or 100 percent white (X shifts between them)
Size-- As big a brush as you can get away with using (hold [ or ] to change brush size)
Select your Cleanup layer, and then go to town!
So, why have I avoided talking about this so far?
It's simple—I think that the less cleanup you do with the Brush tool, the more efficient you'll work.
It feels good to fill something in all the way black. It feels good to get all of the little dots of noise out of the white. Satisfying, like you're really ACCOMPLISHING something.
But, more often than not, those same things can be accomplished more efficiently with one of the other tools I've discussed so far.
Moreover, you don't actually need to eliminate every speck of white from your black areas! The real problems you need to look for are systemic ones—an entire area of your page with broken up black. The white lines unintentionally in the black, like you see above. Noise that is in a particular shape, or, say, cut lines around an object that was pasted on. Those are the kinds of things that will likely be visible in print, not that little grain of white that will soon be swallowed by the black ink surrounding it.
Lastly, make sure to click your Threshold adjustment layer on and off as you work, to preview what your image will look like as a bitmap. Often times things that you think might be problems will disappear completely after the Threshold adjustment.
(We'll return to all of these issues in greater detail when discussing restoring comics from newsprint...)
....and that's all we have time for this week! Next week—we fix shrunken screen tone... most likely, with video!
Let's take a look at another page from Jaka's Story, the book I'm currently in the cleanup stage of.
First I take care of making the white outer mask for the page with the marquee selection tool and the Paint Bucket, as discussed last week, and then use the Median noise filter on the edge of the panel border, also as discussed. Now I'm going to take a look at that first panel a little tighter in.
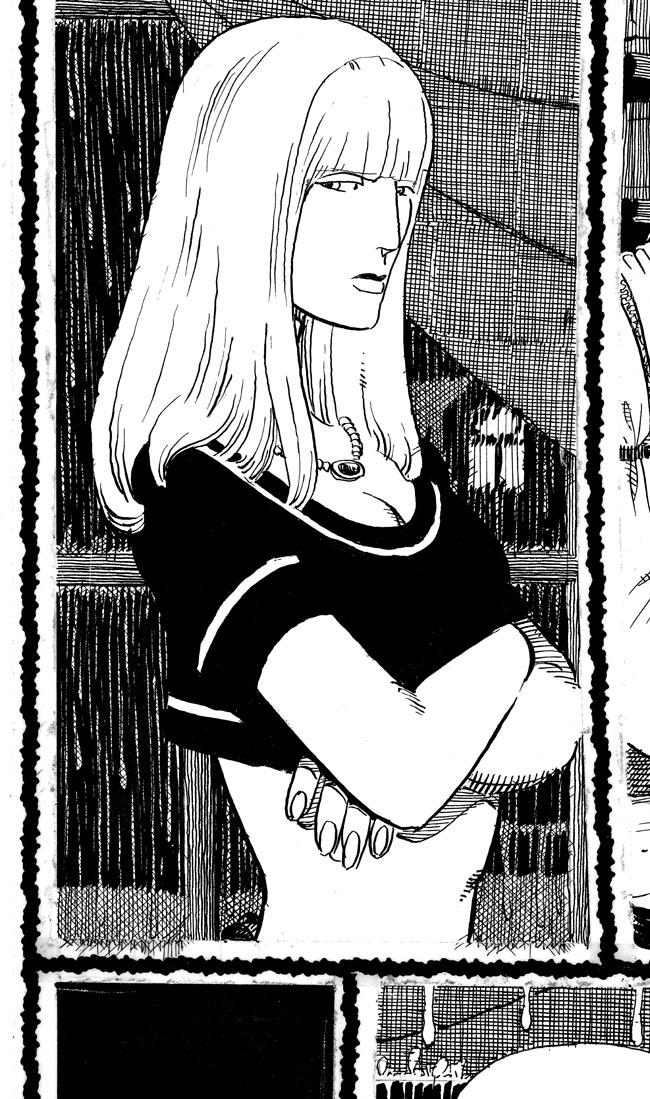

You can see we've got the "panel border shmutz" problem happening here pretty severely. Some of this might be caused by the sticky edge of the carrier film for the border "catching" schmutz over time. But some of it also looks like stray ink lines that were incompletely scraped off the border tape. You can also see an area (to the left and right of the Jaka figure here) that weren't scraped off at all). Regardless of the why, if we let this go as-is, it's going to mar the beautiful clean white border that's the intended look here. So clearly we're ready for another technique!
Oh! Hey! How about —
Cleanup Method D: Dodge Tool
Go ahead and select your Sharpen layer, i.e. the layer that represents your actual sharpened, visible artwork. And then select the Dodge tool (or hit O. Learn your shortcuts!)
In the upper tool preferences bar, change the "Range" to Highlights and the "Exposure" to 100 percent. This is now our "schmutz on white" tool, the perfect way to brush an area to eliminate black on white schmutz on a page.
Very important: DO NOT use this tool over an area of dot tone or mechanical hatching! Even if the effect is not visible to you on screen, it WILL be visible in print. Your eye "reads" dot tone as a continuous gray tone, and thus any changes made to it, however slight, are visible in print when it's resolving to your eye.
With the above caveat in mind, why use this tool? Well, because it's only effecting the highlights of an area, you can sweep over the edge of, say, that cross-hatching, and not have to be as precise as you would be with a brush.

Use it!
Cleanup Method E: the Brush tool
Yes, the humble Brush tool (hit B for the shortcut). It's the most basic cleanup method available to you. For our purposes, we want pretty specific settings:
Round brush--no fancy pants shapes or blending modes etc.
100 Percent opacity
Hardness at 100 percent
Size controlled by pressure of pen on tablet (buy a tablet!)
Color at either 100 percent black or 100 percent white (X shifts between them)
Size-- As big a brush as you can get away with using (hold [ or ] to change brush size)
Select your Cleanup layer, and then go to town!
So, why have I avoided talking about this so far?
It's simple—I think that the less cleanup you do with the Brush tool, the more efficient you'll work.
It feels good to fill something in all the way black. It feels good to get all of the little dots of noise out of the white. Satisfying, like you're really ACCOMPLISHING something.
But, more often than not, those same things can be accomplished more efficiently with one of the other tools I've discussed so far.
Moreover, you don't actually need to eliminate every speck of white from your black areas! The real problems you need to look for are systemic ones—an entire area of your page with broken up black. The white lines unintentionally in the black, like you see above. Noise that is in a particular shape, or, say, cut lines around an object that was pasted on. Those are the kinds of things that will likely be visible in print, not that little grain of white that will soon be swallowed by the black ink surrounding it.
Lastly, make sure to click your Threshold adjustment layer on and off as you work, to preview what your image will look like as a bitmap. Often times things that you think might be problems will disappear completely after the Threshold adjustment.
(We'll return to all of these issues in greater detail when discussing restoring comics from newsprint...)
....and that's all we have time for this week! Next week—we fix shrunken screen tone... most likely, with video!
Sean Michael Robinson is a writer, artist, and musician. See more at LivingtheLine.com.